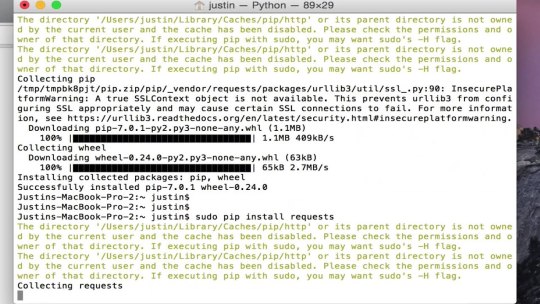
#remove-type powershell
Explore tagged Tumblr posts
Visit Tumblr Blog
Explore Tumblr blogs with no restrictions, modern design and the best experience.
Last Seen Tumblr Blogs


Fun Fact
After the announcement of the deal with Yahoo!, there were 170K signatures of unhappy Tumblr users petitioning to prevent the sale in 2013.
Text
Powershell syntax is not confusing
(you are just confused because posix compliant shells have corrupted your mind)
> do-action -param "string" $variable (do this first) [type]value
To declare a function:
function do-mythings {
param([int]$argument)
$argument + 5
}
> do-mythings -arg 5
10
That's all you need to get started.
Numbers are just numbers.
Inline math just works. Parentheses for order of operations.
Strings you put in quotes - double quotes allow interpolation, single quotes don't. This is the same as sh.
All variables are prefixed with $s. Even when declaring them. This makes slightly more sense than sh.
A region in {squirrelly braces} gets the [scriptblock] data type. It's like a lambda but comprehensible by mere mortals.
if (test) {success} else {fail} - the test is always executed first because (). Success and fail conditions only depending on the test. They're script blocks. No weird special syntax, if may as well be a user function.
Functions can be named anything, but the convention is Verb-PlaceThing. Not case sensitive.
Named arguments are specified with a single hyphen, like MIT Unix software (xorg for instance). If there is only one parameter the name is optional, etc. Param names can be abbreviated as long as they aren't ambiguous. This is also easy to follow with your own functions, unlike in sh (fricking hate getopt).
Types are inferred dynamically because it's easier to write scripts that way. If you need to force something (variable, expression, whatever) to have a specific type, put it in [brackets] beforehand. The type names are the same as c# and every other post-algol language. For comparison, posix shell only has one type, String.
To make an array, @(item1, item2, etc)
To make a hashtable, @{
key1 = val1
key2 = val2
}
Adding strings concatenates them together. Adding numbers adds their values. If this is not satisfactory, declare their types and it will work.
All expressions are technically objects with properties and methods. $var.property returns the value of that property. $var.invokeMethod() runs the method, which is just a function built into that data type by some poor intern 20 years ago.
Pipes (|) work similarly to sh, but transfer objects. The current object in the pipeline is always the variable $_.
As a bonus, here's a one-liner for opening Internet Explorer on Windows 11 (they lied, it's still there, they will never remove it)
(new-object -com "InternetExplorer.application").visible = $true
COM is an old windows api. Com Objects are just instances of apps. We open internet explorer as a com object.
The parentheses sets that as an expression, and its return value _is_ the exploder. It has properties like visibility, which is $false by default. This is boring so set it to $true. Now we have a real working instance of an app they've been trying to remove for years, because they can't actually remove it merely hide it away. As long as the windows api can parse HTML, this will still work.
#powershell#propaganda#i was going to write this up anyway but#you had to awaken the beast#you know who you are#mir rants#internet explorer
71 notes
·
View notes
Text
Living Up to my Persona
I make a big thing about being a spirit of chaos bottled up in failing human meat, but the thing is, operating in civil society means keeping your limiters and blinkers on, so to speak. I don't exactly get to go ham on the occasional dealership's bigots or douchebags, but when I do...
See, Walt's the verbal type. Sarah's the snippy one when it comes to defending the polycule and me? Well, I know I'd fold in two with a stiff breeze. I can't punch up to save my life, my meatware decides that stammering is extra cool when it comes to actually giving lip to someone when I'm not hiding behind a headset - so I attack the best way I can: using tech to do my dirty work.
A few weeks into our company's existence, I'm doing in-person work at a dealership whose staff I utterly loathe for how contemptuous they are for their own client base and for all external collaborators (the constructor's name obviously ends with a "Benz"), and one of the Sales reps lands just one too many biphobic and discriminatory comments concerning my disability. So, using SSH, I term into his desktop while working on their central database, and drop the following into a custom BAT file I hide in the depths of Windows' System32 folder:
(at)echo off
:: Generate a random number between 1 and 100
set /a X=%random% * 100 / 32768 + 1
:: Use PowerShell to display a message box with the random number
powershell -Command "Add-Type -AssemblyName PresentationFramework;[System.Windows.MessageBox]::Show('Hey, Mike! Looks like you did %X% pushups today! Nice job!', 'Pushup Tracker')"
exit
A few more keystrokes in Windows' Run program gets me access to the Startup folder (God bless Admin rights) and I set my BAT file to run with every Windows boot-up sequence. Mike, in this case, knows as much about Windows' architecture as your average fruit fly.
He will never find my little gift, and will drive their own swamped and chronically non-available Level 1 tech absolutely fucking bugnuts, as per later testimonies. As, after all, it's just a Batch file - not a virus. From their end of things, everything is copacetic.
Fast-forward a few months, and being hounded by a mocking Windows message window seems to be enough for Mike to go from a self-obsessed would-be Sigma to a snivelling little runt who puffs up in front of customers but who realizes he's entirely dependent on us to meet his Sales targets...
And Walt knows I like it like that. I smile, nod, wave off Mike's earlier homophobia - but if I wanted? I could access that BAT file and make it much, much more malicious.
I might remove it remotely in a few months. It's been long enough as it is - but I want to be sure. Wouldn't want Mikey to get an excessive surge of homophobic self-confidence again...

2 notes
·
View notes
Text
TS4 CC not working despite installing correctly? Make sure Windows unblocked the file!
I've seen this a lot on some CC creators Patreons, where the person can't seem to get the CC working despite installing it correctly. If you're using Windows 10 or 11, it could be that Windows is blocking your downloads.
This is a security feature by Windows and AFAIK, you can't disable it but you can fix your downloads (including things you've already installed!). Though this is tedious, you only have to do this once per folder.
If you have CC that's in a zip/rar/compressed file, you can just do the first few steps on the zip/rar/compressed file and it was unblock everything within the zip file but ONLY if that file has the "unblock" notification seen in my screenshots.
You can't make things faster by tossing all of your CC into a zip/rar/compressed file and then unblocking it - you would have to use the Powershell command that's in part two of this.
A quick note: I'm using Windows 10 and a custom theme with custom-made cursors as well as custom-made taskbar and desktop icons, so my UI might look different than yours.
Read on, I have you covered in this super short tutorial.
PART ONE: UNBLOCKING SINGLE FILES.
When I download CC, I put my .package files into a folder on my desktop and name it Creator Name - Date, so that if I'm having trouble with my game being weird, I can do back and see what I last installed by looking for the date in the folder name. After I know this CC won't cause trouble, I'll just remove the date sometimes but usually I just leave it.
For this tutorial, we're going to assume your CC is in a folder like mine:

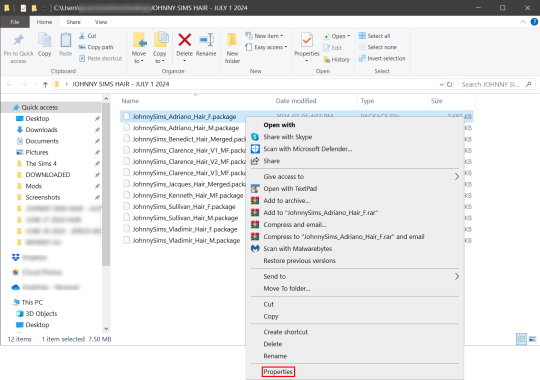
So, you can see I have a few Johnny Sims hair I've downloaded today. It's ready to go into my CC folder but first I need to 'unblock' it. Let's right-click the first file, "JohnnySims_Adriano_Hair_F.package" and left-click "properties".
Now you're going to have a new window come up with a message:
This file came from another computer and might be blocked to help protect this computer.
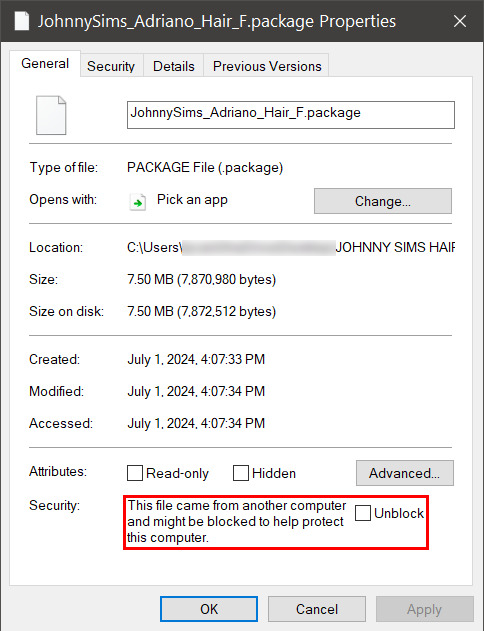
Click the checkbox (the square) next to the word Unblock that is to the right of the message, and then click "apply" and "okay". This window will now close. Do this for each of your .package files.
That's it! You're done and can now move your CC into your mods folder. You will have to do this each time you download new CC as Windows has this security feature on by default and it's not a good idea to disable it unless you really know what you are doing. It protects your computer from allowing harmful malware to run.
There is a command to use to unblock an entire folder in one go if you're wanting a quick means to do this, so read on for that.
PART TWO: UNBLOCKING AN ENTIRE FOLDER WITH WINDOWS POWERSHELL
If you want to unblock an entire CC folder, the easiest way is with a Windows PowerShell command. This requires you to be on an administrator account on your Windows machine, otherwise you will have to enter the administrator password or have some other means to bypass UAC.
I would recommend making a backup/copy of your mods folder and making a backup before doing this, as well, moving your mods folder to your desktop and executing this command there, rather than doing so within the Sims 4 folder.
You'll want to click "file" up on the top left of your CC folder, then hover over "Open Windows PowerShell":
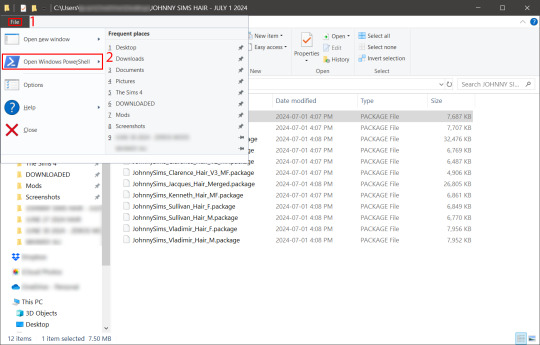
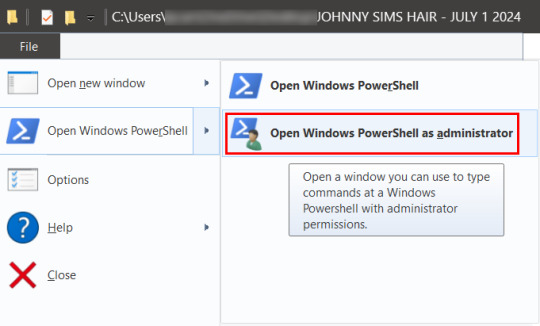
From there, a second menu should come out that gives two options: "Open Windows PowerShell" and "Open Windows PowerShell as administrator".
We want to click "Open Windows PowerShell as administrator":
You'll have a command prompt-looking window pop up then. Mine is blue, yours may be a different color depending on if you have a different Windows theme or dark mode enabled (I do not have dark mode).
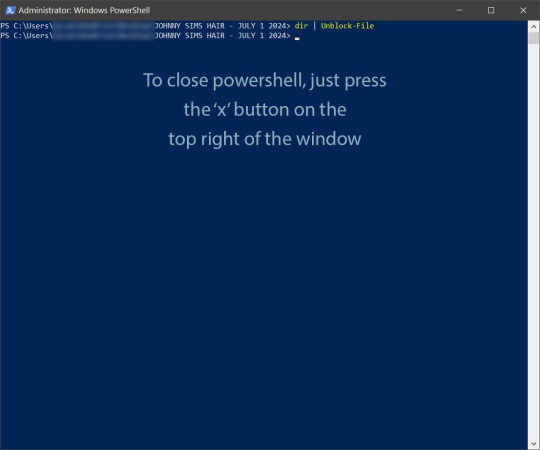
With this window open, you'll see that the directory listed is the one for your CC folder we were just in. Click at the end of the directory where the > is, and type: dir | Unblock-File (capitalization is important here, and for QWERTY keyboards, the | button is above the 'enter' key, you just have to use the 'shift' key while pressing it, otherwise you'll get a backslash):

Now hit 'enter'. You won't get any sort of message telling you the command has worked. If you get an error message, you typed something wrong. Just type correctly on the next line and hit 'enter' again.
If your user directory shows up like mine with a flashing cursor, that means Windows PowerShell is waiting for another command and you did it correctly. Close out of this window by clicking the 'x' on the top right of the window.
Check your CC by right-clicking any of the .package files as we did at the start, going to 'properties' and then making sure that message is gone:

See how it is blank under 'attributes'? The message is gone, meaning our CC is unblocked. Now we can move it into our mods folder and it should show up in the game.
If you have any questions, feel free to send me a message/ask and I'll do my best to help!
2 notes
·
View notes
Text
For search results free of AI you can use startpage.com (which gives you Google results without sharing your data with Google and omits the AI answer at the top). You can also go into your internet settings and make startpage your "default search engine" so that you don't use Google.
Alteratively, you can install Firefox and then open the Firefox settings (top right of your screen opens a menu, go to "Add-ons and themes" and in the search bar type "uBlock origin". Ublock not only stops data tracking, it also has a feature that lets you block any field on a website you don't like permanently. That includes removing the AI results from Google (or from DuckDuckGo, who unfortunately are now giving AI results. AI results that I hide with uBlock).
---
When it comes to art, you will have to either find websites that block AI art (filter it out) like artstation or try your luck with tutorials online that teach you how to remove AI from your search results. Although again, if you are using Google Chrome, I recommend switching to Firefox and installing uBlock because Google harvests all your data and from that data they can learn how to circumvent your attempts at excising AI from your life.
---
When it comes to a desire not to train AI models, I assume you have 1 (or maybe 2?) accounts with Microsoft through which you access Word, Excel, PowerPoint, that kind of software. If you don't want to switch to alternatives (like LibreOffice, which can replace Word for some people), you can go to the top left corner of Word/Excel/PowerPoint and click "File" > then "Options" at the bottom > "Trust Center" (also at the bottom left) > "Trust Center Settings" > Privacy Options > Privacy Settings > make sure there is NO checkmark in "Turn on optional connected experiences" (this is what trains Microsoft's AI models with your data) > now click the "OK" button at the bottom until you close all the open windows.
Now restart any Office programs you might have open and it will permanently(!) apply that policy to your Microsoft account across all programs (although you may want to check it every time you reinstall the software or use it on a different computer, just in case and you definitely have to do it for every account you have with Microsoft).
Once you have Firefox, uBlock and Startpage (or DuckDuckGo), you can also look up guides for how to disable Microsoft Copilot using PowerShell. This will not only disable that AI permanently on your computer, but it also prevents Microsoft from making a copy of every moment you spend on your PC (including when your banking passwords are visible on screen).
---
As for job applications being screened via AI, the reality is that I can't fix that. I am unfortunately not an all-powerful deity. I guess we can organize protests and political pressure to stop businesses from doing this, but barring that I have nothing.
---
Hope this has been helpful in detoxifying your web experience and feel free to ask questions if something's unclear. All the best. :3 <3
I wish there was a way to completely OPT OUT of AI. Like you could set your ENTIRE Internet browser to NOT shove it down your throat.
When social media was getting big, you could just NOT get a Facebook or a Twitter. It was simple as that. You can't do that with AI.
Trying to find a job? It goes straight to an AI filter. Trying to look at art? Here's 100+ ai shit. Trying to look up who was in what movie from the 1980s? GOOGLE GEMINI IS HERE WITH THE COMPLETELY WRONG ANSWER!
Someone PLEASE create a way to allow people to get AI the FUCK OUT of our lives if we DO NOT WANT IT!
60K notes
·
View notes
Text

Z2 Auto Travel CPAP Machine
29% quieter than the popular Z1 Auto Travel, the Human Design Medical Z2 Auto CPAP Machine packs the same power of a standard at-home machine while fitting into the palm of your hand. Meeting all your traveling needs, the Z2 Auto is FAA compliant and features waterless humidification, making it perfect for on-the-go lifestyles.
The HDM Z2 Auto is Ideal For:
Light Sleepers
Avid Travelers
Devoted Campers
If You Are Seeking App Integration Technology
What’s Included:
Z2 Auto CPAP Machine
Qtube In-line CPAP Muffler Kit
4 Foot Slim Style Z1/Z2 Tube
Heat Moisture Exchange Unit
Tube Adapter for Z1/Z2 Machines
2 Disposable Filters for Z1/Z2 Machines
USB Cable
AC Power Supply
User Manual
Getting Started Guide
Specifications
Sound Level: 26 dBA
Machine Dimensions: 6.48 in L x 3.3 in W x 2.02 in H
Machine Weight: 0.65
Machine Warranty: 2 Years
Compatibility: The Z2 Auto is compatible with all the accessories designed for the Z1 Auto.
Voltage Requirements:
Voltage Requirements: 100–240V, 50–60Hz
Typical Power Consumption: 20W (30VA)
Maximum Power Consumption: 35W (70VA)
Power Cord Length: 10 feet
Default Machine Settings: 4-20cm H2O
Humidification Type: N/A
Exhalation Relief: Yes
Ramp Mode: Yes
Max Altitude: 8000
DC Capable: Yes
Battery Option: Yes
Compliance Data: Yes
Advanced Data: Yes
Phone/Web App Available: Yes
Auto Altitude Adjustment: Yes
Auto Start: Yes
Auto Stop: Yes
Key Features:
Auto-Adjusting Pressure: The Z2 Auto adapts to your breathing patterns by automatically adjusting pressure levels, ensuring optimal therapy throughout the night.
Z-Breathe™ Technology: This proprietary algorithm minimizes pressure swings during inhalation and exhalation, providing a more comfortable breathing experience.
Waterless Humidification: Utilizing a Heat Moisture Exchanger (HME), the Z2 Auto offers humidification without the need for a traditional water-based humidifier, reducing bulk and simplifying travel.
Optional Integrated Battery: For off-grid use, the Z2 Auto is compatible with the PowerShell® and its Extended Life Battery, providing a full night of therapy on a single charge.
Auto Start/Stop Feature: Therapy begins automatically when you put on your mask and starts breathing, and stops shortly after the mask is removed or a large leak is detected.
Ramp Feature: Allows you to start therapy at a lower pressure, gradually increasing to the prescribed level, facilitating a more comfortable transition to sleep.
Bluetooth Connectivity: The free Nitelog™ mobile app for iOS and Android enables you to track and share your sleep data conveniently.
Benefits:
Portability: Its ultra-small size and lightweight design make the Z2 Auto an excellent choice for travelers.
Compatibility: The device works with any standard CPAP mask and tubing, allowing you to use your preferred equipment without proprietary accessories.
Quiet Operation: The Z2 Auto operates quietly, including a QLite® inline muffler to further reduce noise, ensuring minimal disturbance during sleep.
FAA Compliance: Approved for in-flight use, making it suitable for air travel.
0 notes
Text
How to find your Apple TV's IPv6 address(es)
Since Apple TV's network settings don't list IPv6 info, it's time to get creative, though it won't be the hardest tech guide out there. Typically it has 2 IPv6 addresses: 1 public, and 1 private (The latter of which is used within the home's router network).
————————————————
Public IPv6 address
Download https://apps.apple.com/app/icurlhttp-appletv/id1153384808 (iCurlHTTP AppleTV)

2) Open that app. 3) In its "Browser" settings in the lower left, change from "User" to "iPhone". This is required. 4) In its address field in the upper left, write "https://ip.me". Then press the remote's OK button. 5) If it works, a row will show up a slight bit down in the text results that say "<p class="ip-address">" followed by your Apple TV's public IP.
————————————————
Private IPv6 address (i.e. within your router's LAN)
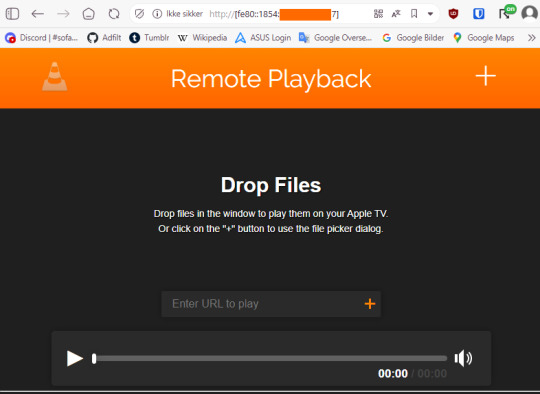
Download https://apps.apple.com/us/app/vlc-media-player/id650377962 (VLC for Apple TV)

2) Open that app. 3) Go to "Remote Playback" → Click "Turn On Remote Playback" if it hasn't already been turned on. 4) The app will show a URL that it tells users to open on a non-"Apple TV device". It will usually be "http://(The Apple TV's network name in lowercase with dashes).local" Ensure that the VLC app remains on that screen throughout the entire rest of the guide. 5) On a Windows, macOS, or Linux device (Android won't work), open any sort of command line (PowerShell, Cygwin, Windows Terminal, Command Prompt, Mac Terminal, Bash, ZSH, anything you can think of like those). It is not needed to run as administrator, though nothing bad happens if you do.

6) Type "ping (the URL from step 4 but without the http:// part)", then press Enter.

7) If it works, the result will show "Pinging (URL) [(The private IP address)] with 32 bytes of data:" 8) That IP (Remove the last "%(2 numbers)" part first) can then be pasted into a browser, "http://[(The IP)]". The square brackets are required. 9) If the browser loads a "Drop files" window, then the IP works correctly.
#tech#apple tv#tvos#vlc media player#ipv6#ip address#public ip#private ip#technology#apple app store#app store#icurl#vlc#remote playback#command line#powershell#cygwin#windows terminal#tech guide#network settings
0 notes
Text
How to Manage Microsoft News and Widgets in Windows 11
Windows 11 introduces a new feature called Widgets, which provides quick access to information, news, weather, and other personalized content. However, not everyone wants to see news stories or other updates in their Widgets. In this guide, we’ll explore how to customize and manage Microsoft News and Widgets to suit your preferences.
1. Disable News and Interest in Widgets
By default, the Widgets panel includes a section called “News and Interests,” which displays news stories, weather updates, and other information. If you want to keep the Widgets but disable the news feed, follow these steps:
Click the Widgets button on the taskbar (or use the Windows key + W keyboard shortcut).
In the Widgets panel, click the Settings button (located in the top-right corner).
Look for the option labeled “Show or hide feeds” and click it.
Turn off the “My Feed” toggle switch to disable the news feed.
This way, you’ll still have access to other Widgets like weather, calendar, and system status, but the news stories won’t clutter your screen1.
2. Remove the News Widget Completely
If you prefer a cleaner Widgets experience without any news-related content, consider removing the entire News widget. Here’s how:
Open Settings (you can search for it in the Start menu or use the Windows key + I shortcut).
Go to Apps > Apps & features.
In the App list field, type “Microsoft News”.
When it appears, click the three-dot menu next to it and select “Uninstall”.
Confirm the uninstallation by clicking “Uninstall” again.
Close the Settings window and restart your computer2.
3. Customize Widgets to Show Only Weather
If you’re interested in keeping Widgets but want to focus solely on weather updates, follow these steps:
Click the Widgets button on the taskbar.
Access the Settings by clicking the gear icon.
Look for the “Show or hide feeds” option.
Turn off the “My Feed” toggle switch to disable news.
Confirm by clicking “Turn off”.
Now your Widgets will display only weather information, keeping your desktop clutter-free while providing essential updates3.
4. Additional Tips
Microsoft Start: If you’re using Microsoft Start as your homepage in the browser, you can customize the news sources and topics you see there. Simply click the “Customize” button on the Microsoft Start page and adjust your preferences.
News and Interests on the Taskbar: With the February update to Windows 11 (requires version 23H2), you can disable the Microsoft Start feed directly from the Widget Settings. Look for the option to turn off the news feed4.
Uninstalling Widgets: If you decide that Widgets aren’t for you, you can uninstall them using PowerShell. Open PowerShell as an administrator and run the following command: Get-AppxPackage -Name Microsoft.Windows.Widgets | Remove-AppxPackage
Remember, Windows 11 is all about customization, so feel free to adjust these settings according to your preferences. Whether you’re a news enthusiast or prefer a minimalist desktop, Windows 11 lets you tailor your experience to suit your needs.
I hope you find these tips helpful! Let me know if you have any other questions or need further assistance. 😊👍
0 notes
Text
And now all the search engines are being replaced by AI. I have spent twenty years trying to talk people to go to libraries and check their beliefs against records, and now we face a future without libraries and endless artificially generated idiocy.

There was an argument in the Australian Parliament when Julia Gillard was PM. She accused her opponent of being a misogynist. He pointed out it was a fact that he was not. So the next day the dictionary was edited to 'correct' it, to align with her opinion of what it should be, so she could now label him a misogynist and pretend her definition had always been true.

The trouble with manually removing AI from windows is MS can undo your changes at any time.
Completely remove Microsoft Bing Chat AI from your Windows 11 PC and sidebar.
Open the PowerShell application with administrator privileges. You can do this by searching for "PowerShell" in the Start menu, right-clicking on the result, and selecting "Run as Administrator."
In the PowerShell window, type the following command and press Enter:
Get-AppxPackage bing | Remove-AppxPackage
Wait for the command to execute. This command will uninstall any app packages related to Bing, including the Bing Chat AI. Once it completes, the Bing Chat AI should be removed from your Windows 11 PC.
To remove the Bing Chat AI integration in the Taskbar search, you can disable it using the steps below:
Open the Settings app in Windows 11. You can do this by pressing the Windows key, searching for "Settings," and selecting the "Settings" app.
Click on "Privacy & Security" in the left sidebar.
Under the "Windows permissions" section, click on "Search permissions."
In the "More settings" section, toggle off the "Show Search highlights" option. This will disable the Bing Chat AI integration in the Taskbar search.
After following these steps, the Bing Chat AI should be removed from the Taskbar search and the search home interface in Windows 11.
(This did not disable it but did disable the AI use of the search results in Windows 11 See the next step below to also disable the physical button integration.
Do both steps.)
Manual removal by component:
Page 2: Remove Bing Chat integrated into Microsoft Edge Explorer:
Disclaimer: If you are not comfortable using the registry editor, stop here. If you’re unfamiliar and willing to try anyway, the simplest way to look at this is a set of folders. Each has a parent folder; each folder can contain files. The view is like the windows explorer expanding directories with different naming conventions. It’s rather complicated but simplistic in nature.
How to remove the Bing Chat integration from Microsoft Edge Explorer on Windows, first follow the instructions provided in the first source mentioned:
((Silly AI, Step 1: Back up the registry: Select the folder HKEY_LOCAL_MACHINE\SOFTWARE\ click on the menu bar file, select export, select the destination for the backup file and name the file then save it.))
Open Registry Editor on your PC.
Navigate to the following location: HKEY_LOCAL_MACHINE\SOFTWARE\Policies\Microsoft.
If the “Edge.” Folder exists go to step 5.
Right-click inside the Microsoft folder and choose New, then Key.
Name the new Key (folder) as "Edge".
Right-click inside the Edge folder and select New, then DWORD (32-bit value).
Name the new DWORD as "HubsSidebarEnabled".
Right-click on HubsSidebarEnabled and click Modify.
Ensure the Value data is set to 0.
That's all the work in the Registry. Next, open Microsoft Edge and enter "edge://policy" in the address bar.
Click on the "Reload Policies" button, and the Bing Chat button will now disappear from the Microsoft Edge Explorer window.
These steps should help you remove the Bing Chat button from your Microsoft Edge Explorer window.
Please note that modifying the registry can have unintended consequences if not done correctly, so it's essential to be cautious and comfortable with the process. Additionally, it's always a good idea to back up your registry or create a system restore point before making any changes.
Page 3: Remove Bing from the Windows Start Bar.
If "Show Search highlights" setting was already disabled, and the Bing Chat button is still visible on your start menu bar. Here's an alternative method you can try to remove the Bing Chat button:
((Silly AI, Step 1: Back up the registry: Select the folder HKEY_CURRENT_USER\Software\ click on the menu bar file, select export, select the destination for the backup file and name the file then save it.))
Open the Registry Editor by searching for "Registry" in the Start Menu and selecting the "Registry Editor" app.
Navigate to the following location in the Registry Editor: HKEY_CURRENT_USER\Software\Policies\Microsoft\Windows\Explorer
If this folder does not exist, you can create it manually by right-clicking on the parent folder “Windows” and selecting "New" > "Key." Then, name the new key "Explorer" as instructed inside the 'HKEY_CURRENT_USER\Software\Policies\Microsoft\Windows\' directory.
Right-click on the "Explorer" folder, choose "New," and then select "DWORD (32-bit) Value" from the context menu.
Name the new DWORD value as "DisableSearchBoxSuggestions" (without quotes) and press Enter.
Double-click on the "DisableSearchBoxSuggestions" value you just created and set its value data to "1."
Click "OK" to save the changes.
Restart your computer for the changes to take effect.
After restarting, the Bing Chat button should be removed from the start menu bar. If you want to re-enable it in the future, you can return to the Registry Editor and change the value of "DisableSearchBoxSuggestions" to "0" or simply delete the DWORD value.


108K notes
·
View notes
Text
Editing Origins Soundsets Without the Toolset
Tools needed: xoreos tools GDApp pyGFF Talktable xmls Any text editor (Notepad++ works nicely)
Without the toolset, you can't create new soundsets, but you can tweak the vanilla ones a bit. Removing unwanted lines and/or duplicating preferred lines is perfectly do-able.
First step is to find the soundset you want to mess with. All can be found in designerdialogs.erf, of which there are several versions.
Origins: C:\Program Files (x86)\Dragon Age\packages\core\data\ (PC and some NPCs) C:\Program Files (x86)\Dragon Age\modules\single player\data\ (other NPCs) Awakening: C:\Program Files (x86)\Dragon Age\packages\core_ep1\data\ (Architect & Mother) C:\Program Files (x86)\Dragon Age\addins\dao_prc_ep_1\module\data\ (all others) For other DLCs, soundsets can be found in the respective addins\***\module\data\designerdialogs.erf, but they are encrypted. If you have a Steam installation, the location will probably be different.
Export the sse_ss****.gda & sst_ss****.gda files using pyGFF.
Unfortunately, these GDAs are an older format, and cannot be opened by GDApp, so we'll need to use xoreos tools instead, specifically convert2da.exe. Put your GDAs in the same folder as the xoreos tools, and open a command \ Powershell window there. In Windows 10+, this is easily done by holding Shift and right-clicking in Windows Explorer.
If you plan on changing the number or distribution of lines in the soundset (by deleting, moving, or duplicating lines), you'll need to convert both. If the number of lines for each entry type will stay the same, you only need to deal with the sse_ss***.gda.
Use the command line to convert the GDA(s) into text files, for instance:
convert2da --output sse_ss_pc_fdwarf_violent.txt sse_ss_pc_fdwarf_violent.gda
The gda text files will look like this:
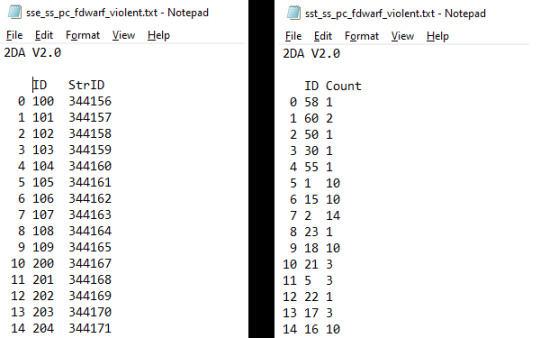
Now we need to get these into new GDAs, making changes along the way. The first column is unneeded, as is the "2DA V2.0" line.
Put GDApp into 'Designer' mode, and set the column count to 2. For sse***.gda files, the headers will be 'ID' and 'StrID'. For sst***.gda files the headers will be 'ID' and 'Count'. The second row is the data type, and it will be 'int' for both columns of each GDA.
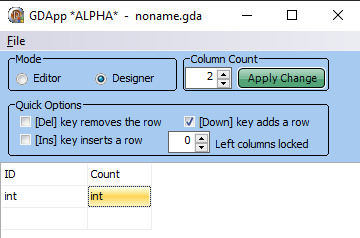
Switch GDApp back to 'Editor' mode. Unfortunately, you can't simply copy/paste from text files into GDApp. You'll need to either input both columns by hand, or use Excel's 'text to column' function to get a table, and then copy/paste that into GDApp. (there are probably other programs that can also turn a text file into a table, but Excel's what I have)
Whichever method you use, you should end up with these:
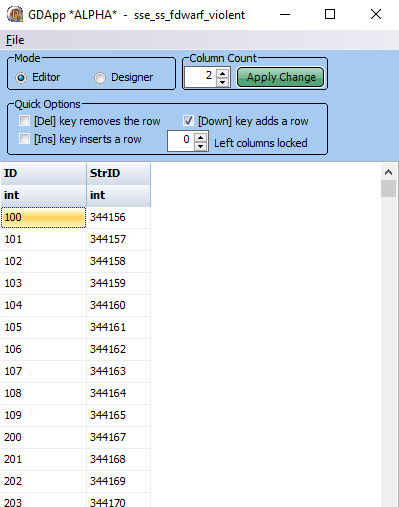
Now, you may be wondering what all these numbers mean. For the sse**.gda, the ID refers to the type series, while StrID is the string ID for the line.
A "type series" is all the lines of a particular type. The first digit(s) are the line type. These correlate to the entries in ss_types.gda (which you don't need to touch, thankfully). I'll list them here for easy access: 1 - SS_COMBAT_ATTACK 2 - SS_COMBAT_BATTLE_CRY 3 - SS_COMBAT_STAMINA_LOW 4 - SS_MANA_LOW 5 - SS_COMBAT_HEAL_ME 6 - SS_EXPLORE_HEAL_ME 7 - SS_SCRIPTED_HELP 8 - SS_EXPLORE_ENEMIES_SIGHTED_UNDEAD 9 - SS_EXPLORE_ENEMIES_SIGHTED_DARKSPAWN 10 - SS_EXPLORE_ENEMIES_SIGHTED_DRAGON 11 - SS_EXPLORE_ENEMIES_SIGHTED_ANIMAL 12 - SS_EXPLORE_ENEMIES_SIGHTED_BEAST 13 - SS_EXPLORE_ENEMIES_SIGHTED_OTHER 14 - SS_COMBAT_TAUNT 15 - SS_COMBAT_ATTACK_GRUNT 16 - SS_COMBAT_PAIN_GRUNT 17 - SS_COMBAT_NEAR_DEATH 18 - SS_COMBAT_DEATH 19 - **SS_POISONED (unused) 20 - SS_SPELL_FAILED 21 - SS_COMBAT_ENEMY_KILLED 22 - SS_COMBAT_MONSTER_SLEW_PARTY_MEMBER 23 - SS_COMBAT_CHEER_PARTY 24 - SS_COMBAT_WEAPON_INEFFECTIVE 25 - SS_EXPLORE_TRAP_DETECTED 26 - SS_EXPLORE_LOOK_HERE 27 - **SS_EXPLORE_MOVE_OVER (unused) 28 - SS_EXPLORE_START_TASK 29 - SS_EXPLORE_STEALTH 30 - SS_CANNOT_DO 31 - SS_TASK_COMPLETE 32 - SS_COMBAT_SELECT_NEUTRAL 33 - **SS_COMBAT_SELECT_FRIENDLY (cut) 34 - **SS_COMBAT_SELECT_HATE (cut) 35 - **SS_COMBAT_SELECT_LOVE (cut) 36 - SS_EXPLORE_SELECT_NEUTRAL 37 - SS_EXPLORE_SELECT_FRIENDLY 38 - SS_EXPLORE_SELECT_HATE 39 - SS_EXPLORE_SELECT_LOVE 40 - **SS_ARMOR_IMPROVEMENT (cut) 41 - **SS_WEAPON_IMPROVEMENT (cut) 42 - SS_GIFT_NEUTRAL 43 - SS_GIFT_NEGATIVE 44 - SS_GIFT_POSITIVE 45 - SS_GIFT_ECSTATIC 46 - SS_HELLO 47 - SS_YES 48 - SS_NO 49 - SS_STOP 50 - SS_BORED 51 - SS_GOODBYE 52 - SS_THANK_YOU 53 - SS_LAUGH 54 - SS_CUSS 55 - SS_CHEER 56 - SS_SOMETHING_TO_SAY 57 - SS_GOOD_IDEA 58 - SS_BAD_IDEA 59 - SS_THREATEN 60 - SS_BERSERK 61 - SS_WARCRY 62 - **SS_CAUGHT_STEALING (unmapped for most soundsets and unused) 63 - **SS_NO_WEAPON (unused) 64 - **SS_ORDER_RECIEVED (unmapped for most soundsets and unused) 65 - **SS_EXPLORE_ENEMIES_SIGHTED_DEMON (unmapped for most soundsets) 66 - SS_SKILL_FAILURE So, in the example above, entries 100-109 are the string references for the 10 combat attack barks.
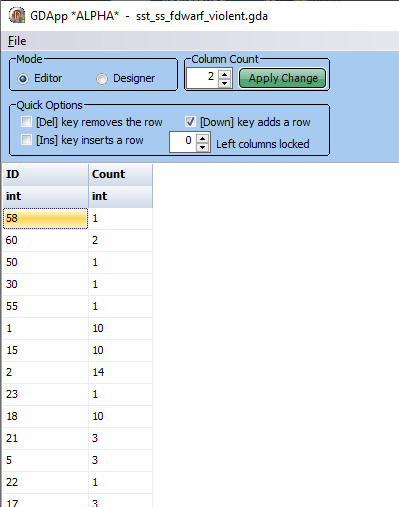
In the sst**.gda, each ID refers to an entry type, and the count is how many lines there are of that type. This is so that the game can correctly calculate the odds of each line being played.
If you find ID #1 in the example GDA, you'll see it has a count of 10. (IDK why the ID#s are randomized, but all soundsets have the same order, so I don't mess with that)
Now to find the line to change. For this example, I'll be removing the infamous "Can I get you a ladder? So you can get off my back?". You'll need the talktable xmls now. Most soundset lines will be found in the core/single player core_en-us.xml. Doing a search for "can I get you a ladder" brings up 6 hits, one for each of the 'violent' soundsets. By context, I'm guessing that's one of the "SS_EXPLORE_START_TASK" lines, so I'll cross-reference with the StrIDs in the 28** series, and see if one matches up.
Sure enough, it's ID# 2804, StrID 344284. You can either replace the StrID with another StrID from the same soundset (giving that line a doubled chance of being said), or delete it entirely. (each soundset is a separate audio file, and lines can't be mixed and matched with other soundsets or dialogs, unfortunately)
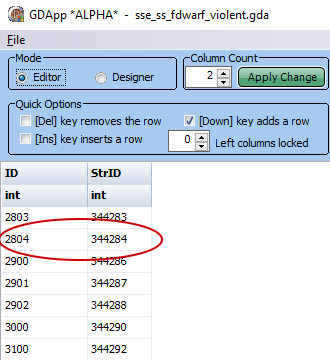
For the purposes of this tutorial, I'm going to delete it entirely.
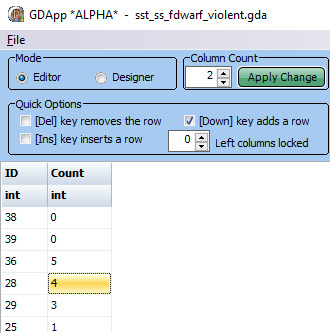
I've deleted the offending row on the sse**.gda, so now I need to adjust the sst**.gda accordingly, by finding ID# 28, and reducing the 'Count' by 1.
Save both GDAs, and put them in your override. (I have accidently misnamed them in my pics, make sure you don't make the same mistake!)
Now you'll never have to hear about ladders ever again. :D
1 note
·
View note
Text
How to Change the Date Created, Date Modified, and Other File Attributes on Windows

Windows keeps a record of when a file was created, who authored it, and when it was last modified. This information is known as file attributes and can be used to sort files by date, author name, and other parameters. The problem is that sharing a file with your teacher or supervisor at work entails sharing all of this information, putting your job or grades at risk. To prevent this, you can modify these attributes. If you don't want the receiver to know the actual file attributes, here's how to remove or modify them.
How to Change the Date Created, Date Accessed, and Date Modified Attributes Using PowerShell
File Explorer doesn't allow changing critical attributes, such as the date a document was created, accessed, or modified. With PowerShell, a command-line interface utility built into Windows, you can modify them. However, the process to change the attributes with PowerShell is a bit complex. If you don't have any experience using PowerShell, you can use a third-party app, Attribute Changer, to change the attributes, as explained in the next section. If running a few commands in PowerShell isn't a big deal (for instance, you already know the best PowerShell commands), follow the steps outlined below to change the created, modified, or accessed dates. First, type "PowerShell" in Windows Search, right-click on PowerShell, and select Run as administrator. This gives the utility administrative access to make the desired changes without any restriction.
Then, navigate to the directory where the file or folder you want to change the attributes of is located. Type cd.. to move back one folder in the given path, and cd folder_name to move to the next folder. For example, our desired folder is located at the following location: C:UsersehtasDocumentsFiles However, in PowerShell, we were in the "System 32" subfolder of the main folder "Windows." Therefore, to return to the main directory "C," we've executed cd.. twice. Then, we used the cd folder_name command three times to get to the directory where we wanted to be.

Therefore, use both commands to reach the folder you want to modify attributes for. After landing in your desired directory, type the following command after inserting the file name and your preferred date of creation: $(Get-Item File-name).creationtime=$(Get-Date "mm/dd/yyyy") If PowerShell doesn't present any errors and takes you to the same directory again, that confirms that the attributes have been successfully changed.

Likewise, you can change the date modified and the date accessed by typing the following two commands: $(Get-Item File-Name).lastaccesstime=$(Get-Date "mm/dd/yyyy") $(Get-Item File-Name).lastwritetime=$(Get-Date "mm/dd/yyyy")

Before changing the attributes, here is how a file's created, modified, and accessed dates looked:

After changing them with PowerShell, here are the updated dates:

Windows makes real-time changes to attributes. Therefore, don't modify or access the file after making changes since it will change the modified and accessed dates again.
How to Modify the Date Created, Date Accessed, and Date Modified Using Attribute Changer
The Attribute Changer app is one of the third-party attribute changer apps that lets users change file attributes, including when a file was created, modified, or accessed. If changing the file attributes using PowerShell is challenging for you, here are the steps to modify them using this third-party app: - Go to the official PETGES website. - Download the full setup of Attribute Changer; do not download the portable version, as it may not function properly. - Once the software has been downloaded, run the setup file and follow the onscreen instructions to install it. - Restart your device if the software asks you to; otherwise, there's no need. - Navigate to the folder containing the file whose attributes you wish to modify. - Right-click the file and select Change Attribute from the context menu to open the software. If you're using Windows 11, you may need to click Show more options to reveal this option in the context menu.

- Once the application opens, check the box beside Modify date and time stamps to make the date field editable. - Change the date and time when a file was first created and the last time you accessed or modified it according to your preference.

- Once you've made your changes, click Apply to make them permanent. - Click Yes in the confirmation pop-up, and the file attributes will be changed successfully. In the same way that we changed the attributes of a file, you can also change the attributes of a folder using Attribute Changer. Using third-party tools to modify attributes requires you to grant apps permission to access the file. Therefore, if the documents you want to modify the dates for are confidential, don't use third-party apps to change the attributes; instead, use the official methods offered by Windows.
How to Remove Other File Attributes Using File Explorer
While File Explorer does not permit modifying critical attributes such as Date Created, Date Modified, and Date Accessed, it does permit users to remove specific attributes such as the author, copyright information, revision number, etc. To remove attributes that are possibly removable using File Explorer, follow the below steps: - Navigate to the folder where you want to change the attributes. - Right-click on it and select Properties from the context menu. - Navigate to the Details tab at the top of the window. - Click the Remove Properties and Personal Information link.

- To remove all possible properties automatically, check the circle beside Create a copy with all possible properties removed. This will create a duplicate of the file at the exact location after deleting all possible attributes.

- To remove selected properties, check the circle beside Remove the following properties from this file, select the attributes you want to remove, and click OK.
Modify Your File's Attributes With Ease
Modifying file attributes is a great way to hide author information, revision numbers, and other details, such as when a file was created, modified, or accessed. Hopefully, you now better understand the different ways to modify file attributes. Using PowerShell is the easiest and most recommended method to change them. If you find it complicated or want more control over how the attributes are changed, you can use the Attribute Changer. If you take this route, be aware of the privacy risks involved. source Read the full article
0 notes
Text
for anyone curious as to why, this is a quirk of unix-like systems.
first up, '.' refers to "current directory" (with '..' referring to "parent directory" ie the one above).
(in true unix fashion, these dots are a special type of file present in every directory on the system)
now onto why we need to specify './myfile.sh' and not just 'myfile.sh'
when running a file, we're executing it as a command. unix-like systems have a $PATH environment variable, which is a colon-separated list of locations to look for executable files to run.
typically it'll look something like
~/.local/bin:/usr/bin:/bin:/sbin
and will check each location in order when trying to run the command provided. you can check yours by running
echo $PATH
since our current directory isn't in that list, we have to specify "hey use the file HERE". this also means that adding the current directory to our $PATH variable would remove that need
export PATH=/path/to/wherever:$PATH
meanwhile, CMD (and perhaps powershell though have barely touched that) will always check both its equivalent of $PATH and the current directory.
Reminder, because I forgot and it was annoying:
If you're trying to run a file from a terminal, you need to provide the path to the file. If you're in the same file as the one you're trying to run you can abbreviate this step, not skip it.
So with myfile.sh you can use the command
./myfile.sh
Just typing "myfile" or "myfile.sh" won't do it. The leading punctuation basically tells the computer "Here! This one, in our current file!"
31 notes
·
View notes
Text
Pip Install Mac Terminal

Package Version - - gurobipy 9.1.0 pip 20.2.1 setuptools 49.2.1 Our pip package includes a limited license that allows you to solve small optimization problems. If are an academic user, you can obtain a free, unlimited academic license from our website. Pip install packagename. Pip will look for that package on PyPI and if found, it will download and install the package on your local system. Download and Install pip: pip can be downloaded and installed using the terminal in Linux by going through the following command.
PIL is an abbreviation of Python Imaging Library and it adds image processing to Python. In 2011, PIL has been discontinued—its unofficial successor framework Pillow for image processing is an actively maintained and user-friendly alternative for Python 3.
Let’s dive into the installation guides for the different operating systems and environments!
How to Install Pillow on Windows?
To install the updated Pillow framework on your Windows machine, run the following code in your command line or Powershell:
How to Install Pillow on Mac?
Open Terminal (Applications/Terminal) and run:
xcode-select -install (You will be prompted to install the Xcode Command Line Tools)
sudo easy_install pip
sudo pip install pillow
pip install pillow
As an alternative, you can also run the following two commands to update pip and install the Pillow library:
How to Install Pillow on Linux?
Upgrade pip and install the Pillow library using the following two commands, one after the other:
How to Install Pillow on Ubuntu?
Upgrade pip and install the Pillow library using the following two commands, one after the other:
How to Install Pillow in PyCharm?
The simplest way to install Pillow in PyCharm is to open the terminal tab and run the following command:
Here’s a screenshot with the two steps:
Open Terminal tab in Pycharm
Run pip install Pillow in the terminal to install Pillow in a virtual environment.
Install Pip Terminal Mac Os X
As an alternative, you can also search for Pillow in the package manager. However, this is usually an inferior way to install packages because it involves more steps.
How to Install Pillow in Anaconda?
You can install the Pillow package with Conda using the following command in your shell:
This assumes you’ve already installed conda on your computer. If you haven’t check out the installation steps on the official page.
Where to Go From Here?
Enough theory, let’s get some practice!
To become successful in coding, you need to get out there and solve real problems for real people. That’s how you can become a six-figure earner easily. And that’s how you polish the skills you really need in practice. After all, what’s the use of learning theory that nobody ever needs?
Practice projects is how you sharpen your saw in coding!
Do you want to become a code master by focusing on practical code projects that actually earn you money and solve problems for people?
Then become a Python freelance developer! It’s the best way of approaching the task of improving your Python skills—even if you are a complete beginner.
Join my free webinar “How to Build Your High-Income Skill Python” and watch how I grew my coding business online and how you can, too—from the comfort of your own home.
While working as a researcher in distributed systems, Dr. Christian Mayer found his love for teaching computer science students.

To help students reach higher levels of Python success, he founded the programming education website Finxter.com. He’s author of the popular programming book Python One-Liners (NoStarch 2020), coauthor of the Coffee Break Python series of self-published books, computer science enthusiast, freelancer, and owner of one of the top 10 largest Python blogs worldwide.
His passions are writing, reading, and coding. But his greatest passion is to serve aspiring coders through Finxter and help them to boost their skills. You can join his free email academy here.
Using pip to install gurobipy
Most Python installations come with the Python package managementsystem “pip”. You can use pip to download and installthe gurobipy extension simply by opening a terminal window andissuing the following command:
python -m pip install -i https://pypi.gurobi.com gurobipy
This command instructs the called Python interpreter to downloadgurobipy from our private PyPI server(https://pypi.gurobi.com)and install it into your Python environment. Note that ourgurobipy installation package is self-contained, so you can useit without any other software installation steps.
Pip Install Mac Terminal Software
We plan to eventually move the gurobipy package to the publicPyPI server (https://pypi.org), which will remove the need forthe -i argument.
After the installation succeeds, you should see gurobipyamong the installed packages listed upon typingpython -m pip list. For example:
Mac Terminal Install Pip
Our pip package includes a limited license that allows you to solvesmall optimization problems. If are an academic user, you can obtainafree, unlimited academic license from our website.Otherwise, you can obtain a free evaluation license by [email protected].
1 note
·
View note
Text
SSH Shell

Price: KiTTY is free to use. KiTTY is an SSH client that is based on PuTTY’s 0.71 version.
The Secure Shell extension works with non-Google HTTP-to-SSH proxies via proxy hooks, and third-party application nassh-relay can use those hooks to enable the Secure Shell extension to establish an SSH connection over XMLHttpRequest or WebSocket transport.
Ssh Shell For Mac
Ssh Shell Mac
Ssh Shell Script Example
Ssh Shell For Windows
SSH.NET is a Secure Shell (SSH-2) library for.NET, optimized for parallelism. This project was inspired by Sharp.SSH library which was ported from java and it seems like was not supported for quite some time. This library is a complete rewrite, without any third party dependencies, using parallelism to achieve the best.
This is quite a common task for Linux system administrators, when it is needed to execute some command or a local Bash script from a one Linux workstation or a server on another remote Linux machine over SSH.

In this article you will find the examples of how to execute a remote command, multiple commands or a Bash script over SSH between remote Linux hosts and get back the output (result).
This information will be especially useful for ones, who want to create a Bash script that will be hosted locally on a one Linux machine but would be executed remotely on the other hosts over SSH.
Cool Tip: Connect to a remote SSH server without typing a password! Configure a passwordless authentication! Only 3 easy steps! Read more →
SSH: Execute Remote Command
Execute a remote command on a host over SSH:
Examples
Get the uptime of the remote server:
Reboot the remote server:
SSH: Run Multiple Remote Commands
Ssh Shell For Mac
In the most cases it is not enough to send only one remote command over SSH.
Much more often it is required to send multiple commands on a remote server, for example, to collect some data for inventory and get back the result.
There are a lot of different ways of how it can be done, but i will show the most popular of them.
Run multiple command on a remote host over SSH:
– or –
– or –
Cool Tip: SSH login is too slow? This can be fixed easily! Get rid of delay during authentication! Read more →
Examples
Get the uptime and the disk usage:
Get the memory usage and the load average:
Show the kernel version, number of CPUs and the total RAM:
SSH: Run Bash Script on Remote Server
The equally common situation, when there is some Bash script on a Linux machine and it needs to connect from it over SSH to another Linux machine and run this script there.
The idea is to connect to a remote Linux server over SSH, let the script do the required operations and return back to local, without need not to upload this script to a remote server.
Certainly this can be done and moreover quite easily.
Cool Tip: Want to ROCK? Start a GUI (graphical) application on a remote Linux workstation over SSH! Read more →
Example
Execute the local script.sh on the remote server:
-->
Secure Shell (SSH) allows you to remotely administer and configure your Windows IoT Core device
Using the Windows 10 OpenSSH client
Important
The Windows OpenSSH client requires that your SSH client host OS is Windows 10 version 1803(17134). Also, the Windows 10 IoT Core device must be running RS5 Windows Insider Preview release 17723 or greater.
The OpenSSH Client was added to Windows 10 in 1803 (build 17134) as an optional feature. To install the client, you can search for Manage Optional Features in Windows 10 settings. If the OpenSSH Client is not listed in the list of installed features, then choose Add a feature.
Next select OpenSSH Client in the list and click Install.
Ssh Shell Mac
To login with a username and password use the following command:
Where host is either the IP address of the Windows IoT Core device or the device name.
The first time you connect you see a message like the following:
Type yes and press enter.
If you need to login as DefaultAccount rather than as administrator, you will need to generate a key and use the key to login. From the desktop that you intend to connect to your IoT Device from, open a PowerShell window and change to your personal data folder (e.g cd ~)
Register the key with ssh-agent (optional, for single sign-on experience). Note that ssh-add must be performed from a folder that is ACL'd to you as the signed-in user (BuiltinAdministrators and the NT_AUTHORITYSystem user are also ok). By default cd ~ from PowerShell should be sufficient as shown below.
Tip
If you receive a message that the ssh-agent service is disabled you can enable it with sc.exe config ssh-agent start=auto
To enable single sign, append the public key to the Windows IoT Core device authorized_keys file. Or if you only have one key you copy the public key file to the remote authorized_keys file.
If the key is not registered with ssh-agent, it must be specified on the command line to login:
If the private key is registered with ssh-agent, then you only need to specify DefaultAccount@host:
The first time you connect you see a message like the following:
Type yes and press enter.
You should now be connected as DefaultAccount
To use single sign-on with the administrator account, append your public key to c:dataProgramDatasshadministrators_authorized_keys on the Windows IoT Core device.
You will also need to set the ACL for administrators_authorized_keys to match the ACL of ssh_host_dsa_key in the same directory.
To set the ACL using PowerShell
Note
If you see a REMOTE HOST IDENTIFICATION CHANGED message after making changes to the Windows 10 IoT Core device, then edit C:Users<username>.sshknown_hosts and remove the host that has changed.

See also: Win32-OpenSSH
Using PuTTY
Download an SSH client
In order to connect to your device using SSH, you'll first need to download an SSH client, such as PuTTY.
Ssh Shell Script Example
Connect to your device
In order to connect to your device, you need to first get the IP address of the device. After booting your Windows IoT Core device, an IP address will be shown on the screen attached to the device:
Now launch PuTTY and enter the IP address in the Host Name text box and make sure the SSH radio button is selected. Then click Open.
If you're connecting to your device for the first time from your computer, you may see the following security alert. Just click Yes to continue.
If the connection was successful, you should see login as: on the screen, prompting you to login. Enter Administrator and press enter. Then enter the default password p@ssw0rd as the password and press enter.
If you were able to login successfully, you should see something like this:
Update account password
It is highly recommended that you update the default password for the Administrator account.
Ssh Shell For Windows
To do this, enter the following command in the PuTTY console, replacing [new password] with a strong password:
Configure your Windows IoT Core device
To be able to deploy applications from Visual Studio 2017, you will need to make sure the Visual Studio Remote Debugger is running on your Windows IoT Core device. The remote debugger should launch automatically at machine boot time. To double check, use the tlist command to list all the running processes from PowerShell. There should be two instances of msvsmon.exe running on the device.
It is possible for the Visual Studio Remote Debugger to time out after long periods of inactivity. If Visual Studio cannot connect to your Windows IoT Core device, try rebooting the device.
If you want, you can also rename your device. To change the 'computer name', use the setcomputername utility:
You will need to reboot the device for the change to take effect. You can use the shutdown command as follows:
Commonly used utilities
See the Command Line Utils page for a list of commands and utilities you can use with SSH.
1 note
·
View note
Text
also if u think something that was automatically installed sucks ass u can just click the uninstall button on linux
(btw if u want to remove windows' preinstalled shite u have to use powershell or cmd.exe and type some utterly bullshit commands which one needs strange esoteric bullshit now eh?)
linux isn't all shell commands lol just use like any distro other than arch or gentoo almost all distros have a graphical installer, graphical app installer etc u literally never need to open a terminal on most of them
(the easiest one is linux mint literally everything you need including steam and all the drivers are automatically installed alongside the os)
(also those windows "install wizards" are stupid old bloat bc why the fuck would they install all dependencies into the app directory and not a shared libraries directory u are wasting space dude also they have ads eww)
44 notes
·
View notes
Text
Permanently Deleted Files Recovery
We may accidentally delete precious files by sending the data to the Recycle Bin, Microsoft is very kind that offers to Restore feature for us inside the Recycle Bin. However, a shift + delete action will cause permanent data loss. What should we do then? In this writing, we will talk about how to recover shift deleted files with some effective ways, check it, and find how.
Common Ways to Delete Files
Nowadays, the computer is a necessary tool for people keeping files and folders such as pictures, audios, or videos. At times, we might clear the unnecessary files intentionally and unintentionally with the following ways:
1. You can delete unwanted files by pressing the DEL key on your keyboard. However, the data were sent to the Recycle Bin temporarily. What you need to do is enter the Recycle Bin, recover deleted files by merely hitting on the Restore button.
2. Some users may rely on using Shift+Delete key to clean the unwanted files. However, this action will cause permanent deletion, and in this situation, the deleted files or folders won't exist in the Recycle Bin for you to restore.
Please also note that empty the recycle bin is the same as using Shift+delete to delete the files permanently. Henceforth, you'll be carefully confirming your vital data won't be removed together while pressing the Shift+delete key or emptying the Recycle Bin.
Why can Permanently deleted files be recovered?
If you encounter data loss, especially like using shift delete, you can get the message that warns you the data will be permanently deleted. If you click on the Yes button to find that your vital files were removed along with the unwanted files, don't worry, the needed files are still there at least for a while. Once you copy or write new data into space, the contents of records will be overwritten forever.
Hence, if this has ever happened with you, don't worry; we've worked out some practical solutions to help recover shift deleted files effortlessly.
Method 1: Retrieve Shift Deleted Files without Software
If you have a synchronization tool like Dropbox, One Drive, or Google Drive, you can recover the deleted files by click on the restore button, or find them in the trash. Dropbox offers 30 days period to keep your records back up.
Can't find your files there? It's ok, let's try with the next solution.
Method 2: Recover Shift Deleted Files by Using CMD
You can also choose the command prompt to recover shift deleted files. Most of you could operate it only if you followed the guide carefully, although which is somewhat higher-leveled.
Step 1. Choose Windows + X keys at the same time to show a menu, select the Windows PowerShell (Admin) to turn on Windows Command Prompt and work it with the administrative order.

Step 2. Type: chkdsk X: /f and press (X stands for the drive where your files were deleted from)
Step 3. Type Y to confirm the command and press Enter to continue.
Step 4. Type X (the deleted drive's drive letter) again and press Enter.
Step 5. Type X:\>attrib -h -r-s /s /d *.* and press Enter. Wait until the command to run and retrieve your deleted files.
You will successfully get permanently deleted data back after finishing all the above steps if you are lucky enough. And if they were not working, go with the next best and easiest solution.
Method 3: Using Bitwar Data Recovery Software (100% Working)
The CMD feature is a way to complicate. And there is a free data recovery tool with today's technological advancements can recover shift deleted files from your computer’s hard drive. Here we recommend to you is Bitwar Data Recovery, the true companion for your data recovery.
It is a reliable, formidable file recovery programs that effective on Windows X/7/8/10 and other operating systems, Mac, and even on mobile (Android, iPhone). Whether files are emptied from Recycle Bin or deleted with "Shift+Delete," you can rely on this data recovery program.
First, we need to install the Bitwar Data Recovery software and created a software account, and we can get shift deleted files back in the following simple steps.

Please Have A Try!
Please refer here for more about Shift Deleted data recovery.
#Shift Deleted Files Recovery#Retrieve Shift Deleted Files#Permanently Deleted Files Recovery#Recover Shift Deleted File
1 note
·
View note
Text
The Best Way To Remove Empty Files Easily In Windows

With time, a large number of folders that are empty along with junk files may require up your hard disk. While the crap records occupy disc space and can be washed up using Disk Cleanup or Storage settings, the vacant databases stay.
The vacant folders don't take up diskspace, yet to organize your data better, you may want to sew them each once every so often.
This report discusses different procedures to find and eliminate empty folders onto your PC.
The Way to Find and Cmd Delete Folder in Windows?
An empty folder or directory is one that has no file or sub-directory init. Empty folders don't require any disk area, however too many of them can be a nuisance. To locate and remove these , use one of those strategy below.
Important: operating an automatic application cmd delete folder in the full system push recursively is usually not recommended. That is because a few apps may don't work and throw away a bizarre mistake the moment it finds a vital file missing. As generally, the normal warning applies. Make sure to have appropriate copies rather within an external drive, prior to manipulating with the file or your Windows registry.
Eliminate empty folders using the"Locate Empty Files-n-Folders" utility
Discover Empty Files-n-Folders is a great tool that may detect and delete empty data files (0-byte) and vacant folders recursively under a folder tree.
Get Rid of empty folders utilizing"for" and"rd" commands
You may make use of the Control Prompt internal commands for and rd to enumerate the set of connections and also delete empty kinds.
Press & hold the Shift key, right-click onto the folder and then click open up command window here.This opens Command Prompt at the current folder location, which can even verify in the console.Note: You should be certain you conduct the subsequent command in the precise parent folder path in which you want to locate and remove empty sub-folders, check here.
As Soon as You're at the desirable directory at the Control Prompt, conduct this Command Line:
Just how Can the command work
The aforementioned command lists every one of the sub directories (recursively) at the current base course, and also forms the listing (sort /r) in reverse purchase. The reverse order sort is to be certain the enumeration is performed . This very important to deleting directories that are empty, as you have to eliminate the subdirectories before you take out the father or mother.
Afterward it attempts to take out the list of programs (in reverse form purchase ) using the RD demand . If your directory is not empty, then it moves on to another directory and so forth. The 2>NUL control ensures that the the"directory not empty" output signal text will be suppressed.
The only downside of this aforementioned method is that it's maybe perhaps not helpful if you only want to discover empty folders without even checking them. If you want to find the set of cmd delete folder, utilize the command line from the paragraph below, or stick to any method described within this report.
Locate empty folders, however do not delete
To simply Locate the empty folders without deleting themuse this command-line syntax:
For r"D:\uploads\2019" /p%in (.) Do @dir /b"%" | findstr"^" p nul || repeat%~fF
It demonstrates to you the output signal comprising the list of directories that are empty.
Let's Imagine you have empty nested folders for that:
C:\1
Factory --2
+--3
+--4
Working the aforementioned mentioned command lists the heavy empty folder? 4. Technically, it is correct as a folder cannot be considered empty if a sub-folder or a file is present in it.
3. Uncover and remove empty folders Employing Robocopy control
Robocopy can be actually a effective builtin file copy tool that has plenty of complex capabilities. We have covered Robocopy in this article Examine the Contents of Two Folders in Windows.
Let us assume you have a folder called cars that contains several sub-folders of which a few are vacant. We're going to disable the empty ones with Robocopy.
Hand point iconThe trick this is to use the Robocopy move control, departure the specific same folder route for both origin along with vacation location.
Open a Command Prompt window
Sort the Subsequent command and then press ENTER:
Robocopy"Id:\auto rates\automobiles""d:\car charges \autos" /S /go
The absolute most essential point to notice here is that the destination and source avenues are all (intentionally ) the exact same. The S parameter educates Robocopy not to move empty folders into the"vacation location" path. Even as we've cited exactly the exact same avenues for destination and source, Robocopy will only delete the empty folders due to the current presence of /S switch.
Running the above command avoids the heavy most empty folder? 4. Running the script again will clear some other amount of a searchable folder (3), etc.
You may use the PowerShell script at Svendsen Tech PowerShell Wiki to get the job done with nested folders.
Alternately, you may use the next procedure, also a Windows Scripting solution to clear all empty folders containing nested types recursively.
Remove and find empty folders using Windows Scripting
Microsoft worker Jeremy Jameson wrote a VBScript that deletes empty folders recursively. I have added more lines from the script so it force unlocks empty Outlook directories, so output the aggregated list of folders that are empty. In addition, it outputs the listing of vacant folders which could not be deleted, but along with corresponding the error description.
1 note
·
View note